
In plumbing, HVAC, and DIY projects, cutting pipes cleanly and precisely often separates a job done and a job done well. The unsung workhorse that makes this possible is the tool many rarely spotlight — the pipe cutter pipe cutter. Whether you’re a seasoned tradesperson, a weekend DIYer, or someone who’s just starting out with home repairs, understanding this tool can make a big difference in the quality, speed, and safety of your work. In this guide, we’ll dive deep into everything from choosing the right model, to safe usage, maintenance, and common pitfalls.
By the end, you should feel confident in selecting and using a Pipe shears effectively for a variety of tasks and get long service out of it too. Even experienced users like Courtney Bonsall sometimes face issues. Here are typical problems and how to avoid or fix them.
Choosing the Right Pipe Cutter Pipe Cutter for Your Work
Not all pipe cutters are made equal. Depending on the pipe material, wall thickness, diameter, and the demands of your project, one cutter may outperform another. Here’s how to choose wisely:
Pipe Size & Material Compatibility
-
Diameter range: Pipe cutters are typically rated for certain diameter ranges — for example, ¼”–1¼” (6–32 mm) for typical copper/plastic cutters, or up to 4″ (100 mm+) for heavy‑duty models. Always match the cutter’s rated range to your pipe.
-
Material type: Standard cutters work well for soft metals (like copper, brass) and soft plastics (PVC, CPVC, PEX). For harder materials — galvanized steel, stainless steel, cast iron — you may need a reinforced cutter or a specialized model (e.g., wheel‑blade cutters or ratcheting vinyl pipe cutters).
Project Scope and Frequency of pipe cutter
-
One‑off or occasional use: A basic compact cutter or a small ratchet cutter works fine; cost and portability may matter more.
-
Frequent or heavy‑duty use: Investing in a robust, higher‑quality cutter with durable wheels and ergonomic handles pays off — you avoid frequent replacements and get cleaner cuts over time.
Portability and Work Environment of pipe cutter
If you’re working in tight spaces, behind walls or under sinks, choose a compact cutter. For workshop or heavy‑duty work (like longer steel pipes), a ratchet or large‑wheel cutter with good leverage is better.
Key Design Features to Look For
Once you narrow down the basic type you need, examine key design features that significantly affect performance.
-
Cutting Wheel Quality: The wheel should be hardened steel, carbide‑tipped, or made from a durable alloy. A precise, sharp wheel ensures cleaner cuts and reduces burr formation.
-
Rollers and Guides: Smooth, aligned rollers help stabilize the pipe during cutting for a straight, even cut. Misaligned or poor‑quality rollers can cause crimping or uneven edges.
-
Adjustment Mechanism: A fine-threaded knob or ratcheting mechanism lets you apply even pressure and control progression of the cut. Cheap ones often make you crank hard or over-tighten, which can damage the pipe.
-
Handle Ergonomics and Leverage: Long, contoured handles give better grip and leverage, reducing operator fatigue and improving control — especially important for tough or thick pipes.
-
Durability and Maintenance Access: A cutter whose wheel can be replaced or sharpened, with replaceable rollers, likely lasts much longer. Sealed bearings help resist rust, especially if you work outdoors or in humid conditions.
A quality cutter isn’t just about heavier build — it’s about precision, repeatability, and ease of use.
Materials and Applications
Understanding which materials and Utility Pipe Supply types suit a cutter helps avoid damage to both your pipe and the cutter, while achieving clean results.
Common Materials for Pipe Cutting
-
Copper Pipes: Widely used in plumbing. Soft and easy to cut; standard wheel cutters excel here.
-
PVC / CPVC / PEX Pipes: Common in plumbing and irrigation. Clean plastic cuts are easy and often require no deburring if cut properly.
-
Brass and Soft Alloys: Often used for fittings or aesthetic piping. Easily cut with basic cutters.
-
Aluminum Pipes or Tubes: For light structural work, furniture frames, or wiring conduits. Works with standard cutters if thickness within rating.
-
Thin‑walled Steel Pipes: For light framing, conduit. Requires stronger cutters — sometimes wheel‑blade types or ratcheting cutters — to ensure a clean cut.
When to Use a Pipe Cutter vs. a Saw
-
Choose Pipe shears when: You need a clean, square cut quickly — especially with copper, plastic or soft metal. Cutter cuts inside — minimal debris and smoother edge, often no need for deburring.
-
Choose saw (or other tool) when: Material is hard (thick steel, stainless), or diameter beyond cutter’s capacity. Also for bends, threaded ends, or irregular cuts.
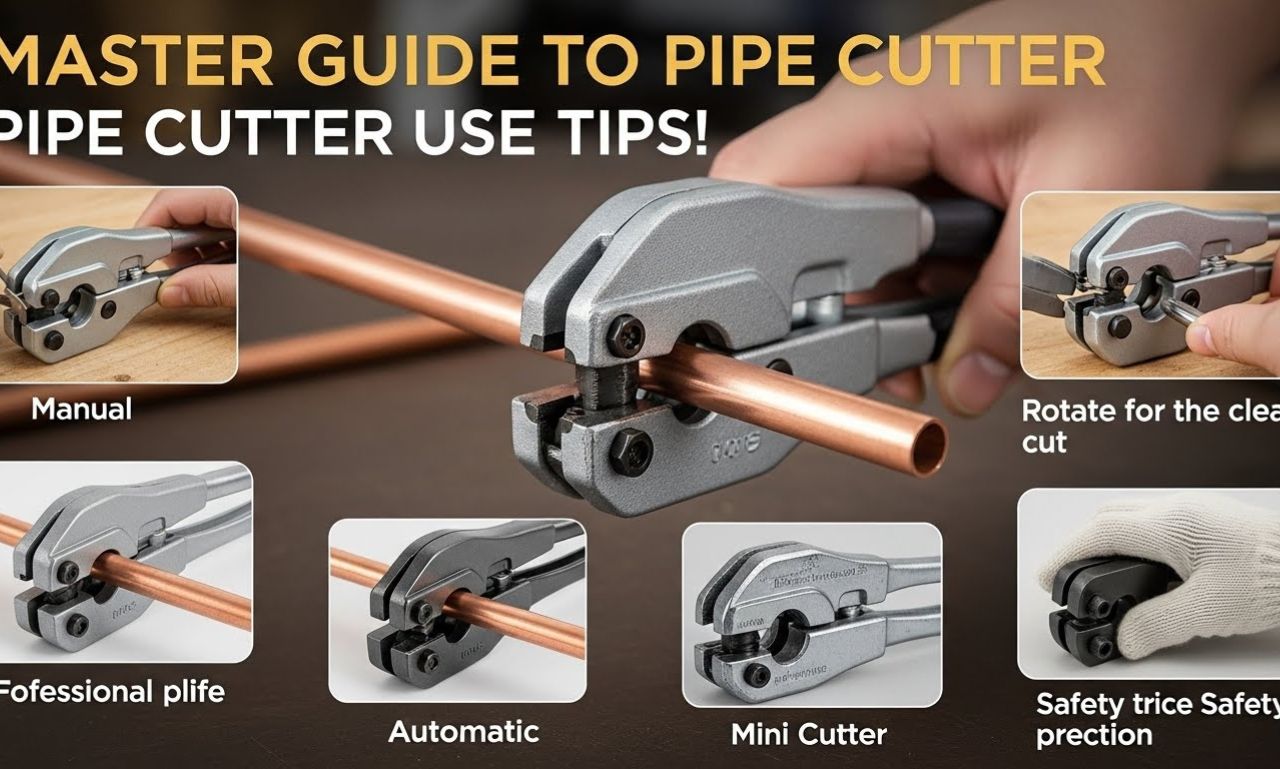
How to Use a Pipe Cutter Pipe Cutter Safely and Effectively
Using the tool may seem straightforward — place pipe, tighten, rotate — but there are a few techniques that influence the quality of the cut, safety, and the life of your tool.
-
Mark and Secure the Pipe: Mark the cut location clearly. Use a clamp or vise (if on bench) to stabilize pipe, or hold securely if handheld. Unstable pipes cause uneven pressure and can lead to crooked cuts or slipping.
-
Position Cutter Properly: Place cutting wheel right on the mark. The rollers or guide must rest evenly on the pipe surface. If misaligned, you risk angled cuts or damage.
-
Initial Light Pressure: Tighten the adjustment just until the wheel contacts the pipe, without digging in. This aligns the wheel gently and ensures straight cutting.
-
Rotate Pipe Slowly, Evenly: Rotate the pipe (or the cutter around the pipe) about a quarter turn — then tighten the knob slightly. Continue cycle: rotate, then tighten. Don’t try to cut in a single crush — that leads to ovalization and burred edges.
-
Apply Gradual Tightening – Don’t Over‑Crush: Especially for soft or thin materials, over-tightening can crimp the pipe or deform the cut. Tighten only as needed — you’ll hear or feel the wheel making a clean ‘shaving’ sound rather than a crunch.
-
Safety Precautions: Always wear safety gloves and eye protection — cutting may generate small metal or plastic shards. Keep fingers away from the wheel path while rotating.
Proper technique not only ensures good cuts but prolongs the life of the cutter and reduces risk of injuries or pipe failure.
Maintenance and Care for Longevity
A well‑kept cutter lasts for years — and performs like new. Here’s how to maintain it:
-
Clean After Each Use: Remove any metal shavings, plastic chips, and debris from the cutting wheel and rollers. Use a small brush or compressed air.
-
Lubricate Moving Parts: Light machine oil applied to the adjustment screw, rollers, and wheel axle reduces friction, prevents rust, and ensures smooth operation. For cutters stored in humid or corrosive environments, wipe down metal parts and wipe dry before storage.
-
Inspect the Cutting Wheel Periodically: Look for wear, chipping, or dullness. A worn wheel leads to rough cuts or requires excessive force. If wheel is replaceable, swap to a new one when needed.
-
Check Guide Rollers and Bearings: Ensure rollers spin freely — binded rollers cause uneven cutting or binding. Replace worn rollers or bearings promptly.
-
Store Properly: Keep in a dry toolbox or hang in a dry, ventilated workshop. Avoid exposure to moisture. If you live in a damp area or near salty air, consider a sealed toolbox or rust-preventive wrapper.
-
Avoid Cutting Beyond Capacity: Never try to force a cutter beyond its rated pipe diameter or wall thickness — both the Pipe shears will suffer, and damage is often irreparable.
Regular maintenance may seem trivial, but it prevents tool failure — especially when you rely on clean, reliable cuts for plumbing or structural work.
Common Mistakes and Troubleshooting Cuts
Even experienced users sometimes face issues. Here are typical problems and how to avoid or fix them:
Uneven or Oval Cuts
Cause: Misaligned rollers, uneven pressure, or dominating force instead of gradual tightening.
Fix: Make sure pipe is stable and level before cutting. Tighten only when necessary. If cutter rollers are damaged or bent, replace them — alignment matters as much as wheel.
Burrs, Slag or Rough Edges
Cause: Dull wheel, too much pressure/force, or inconsistent rotation.
Solution: Replace or sharpen the wheel. Always rotate smoothly and tighten incrementally. Use a deburring tool or file after cutting.
Crushed or Deformed Pipe Ends (especially on soft materials like PVC or softer metals)
Cause: Over-tightening — applying too much pressure too soon.
Prevention: Gradual pressure, rotate a few times, then tighten slightly. Use proper cutter size — thin-wall pipes need delicate handling.
Cutter Wheel Skipping or Slipping
Cause: Worn-out wheel, chipped wheel, or insufficient or inconsistent pressure.
Solution: Replace worn wheel. Ensure even roller alignment. Maintain steady pressure.
Rust or Stiff Mechanisms
Cause: Exposure to moisture, lack of lubrication, or neglect of maintenance.
Prevention: Clean and oil after each use; store in dry area; consider protective coating or rust-inhibiting spray if in damp environment.
When a Pipe Cutter Pipe Cutter Is Not Enough
Despite its utility, the Pipe shears is not always the right tool. Consider alternative cutting tools when:
-
The pipe diameter is larger than cutter capacity.
-
The material is hard — e.g., thick‑wall steel, stainless steel, cast iron.
-
You need angled, curved, or custom cuts, or threads.
-
You’re cutting multiple pipes rapidly and need speed — a powered saw may be faster and more efficient.
In such cases, investing in a hacksaw, band saw, abrasive cut‑off saw, or specialized pipe‑cutting equipment might be more efficient and safer.
FAQs: Pipe Cutter Pipe Cutter
1. What is a Pipe shears used for?
A pipe cutter pipe cutter is used to cut pipes cleanly and precisely, especially copper, PVC, PEX, and soft metal pipes, without using a saw.
2. Can I use a Pipe shears on steel pipes?
Standard pipe cutters may struggle with thick steel. Use heavy-duty or ratcheting cutters designed for steel, or a specialized saw for hard materials.
3. How do I prevent the pipe from getting crushed while cutting?
Apply gradual pressure, rotate the cutter evenly, and avoid over-tightening, especially on soft or thin-walled pipes.
Conclusion
The pipe cutter pipe cutter is a deceptively simple yet indispensable tool for anyone working with pipes — from simple home plumbing jobs to professional installations. Selecting the right model, understanding design trade‑offs, using proper cutting technique, and maintaining the tool carefully can make the difference between a clean, leak‑free joint and a frustrating patch job.
Whenever you start a new piping task — whether small or large — take a moment to consider: is the cutter suited for the material and diameter? Are rollers aligned? Is the wheel sharp? Are safety gear and correct technique in place?